The MicroCode language is defined in terms of pages, where a page has a list of rules, and each rule consists of a When section and a Do section, each with a list of programming tiles.
MicroCode supports events, conditions on the events, sequencing, loops, variables, and simple arithmetic (addition, for now) over constants and variables. See samples for a list of annotated examples.
The picture below shows a 1-page program with four rules.
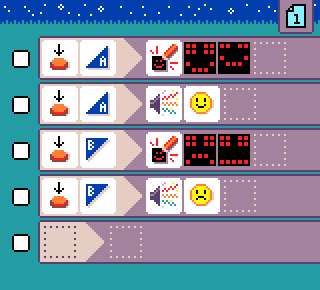
The first two rules run when A is pressed.

- when
 press
press  button A, do
  show image smiley.

- when press button A, do
 play sound emoji
  happy.
The other rules are similar but trigger for button B.
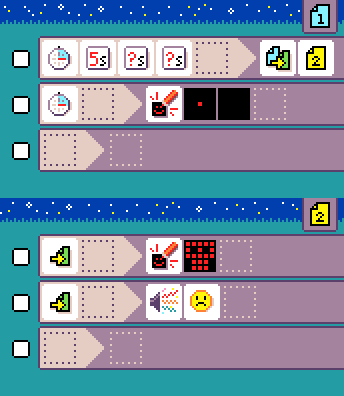
Pages and rule execution
Execution of the MicroCode program starts on ![]() page 1. All the rules on that page are active. Rules on another page only become active when the program switches to that page
(via an explicit
page 1. All the rules on that page are active. Rules on another page only become active when the program switches to that page
(via an explicit ![]() switch-page command, discussed later).
Any rules that might still be executing on the current page (like an animation in a loop) are terminated before
the page switch takes place (you can never have rules from different pages executing at the same time).
switch-page command, discussed later).
Any rules that might still be executing on the current page (like an animation in a loop) are terminated before
the page switch takes place (you can never have rules from different pages executing at the same time).
Events and rule ordering
Events are processed by MicroCode one at a time. For example, if you push the A and B buttons at (roughly)
the same time, then MicroCode will process either A before B or it will process B before A.
Given an event, MicroCode processes the event by executing the rules for that event in the
order they appear on the current page. For each rule, this means evaluating if the conditions
on the event in the When section hold and, if so, starting the rule’s Do section.
Rule termination
Most of the commands in the Do section complete quickly, such as assigning a value to a variable;
others, like the display of a sequence of images take time proportional to sequence’s length;
furthermore, an animation or sound sequence can be repeated multiple times
(or without bound) using a repeat tile. In the case of an animation, a currently
running rule that is using the micro:bit screen
will be terminated if a new rule that also uses the micro:bit screen is started.
WHEN section
The left-hand side of a rule, the When section, starts with an
event tile from the following dialog, which appears when you select the leftmost empty tile of a rule:
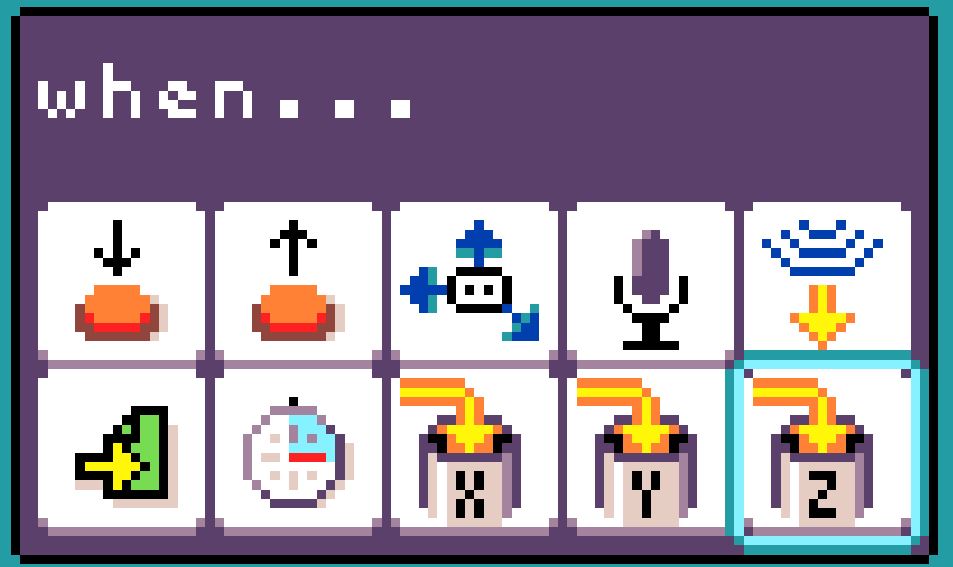
-
pressof button, micro:bit icon, or pin 
releaseof button, micro:bit icon, or pin
moveof accelerometer, in various ways measures the amount of sound in the environment (levels 1-5, where 1 is quiet and 5 is very loud); it also can respond to a quick/loud sound (event)
temperature change, eitherwarmeror `colder
light sensormeasures the amount of light (levels 1 - 5, where 1 means little light present and 5 means a lot of light present)`, using the micro:bit’s LED matrix!
radio receiveof a number
start pageonly runs when the page is started (or switched to), with an optional delay
timerof a time


variable (X,Y,Z) changedto a number
If the when section is left empty,
the rule will run once when the page is started.
Event parameters and conditions
An event tile can be followed by none, one or more parameter tiles which determines the conditions under which execution will proceed from the When section to the Do section, Every event has a default parameter, which is used when no parameter is specified. The defaults are:
-
press, defaults tobutton A;
other options include button B ,
,
micro:bit logo ,
,
pin 0 ,
,
pin 1 ,
, pin 2
-
release, defaults and options are the same as forpress
The dialog below shows the parameters associated with the button press/release events.
-
move, defaults to
shake; other options include
tilt up,
tilt down,
tilt leftand
tilt right -
heardefaults to quick/loud event -
temperature change, either 1 degree (Celcius)warmer or
or colder (defaults to
 warmer) -
light sensordefaults to value 1 (least light); other options include 2, 3, 4, and 5 (most light) -
radio receive, defaults toany -
timer, defaults to1/4 second -
variable (X,Y,Z) changed, defaults toany(any value change triggers it)
Conditions on event values
When an event carries a numeric value (in the case of receiving a radio message or a variable being updated), if that value is equal to the sum of the values (constants and variables) that follows, then execution will proceed to the DO section. Here are the five available (dot) values:
1 dot
2 dots:
3 dots:
4 dots:
5 dots:
The timer is parameterized with various times that can also be sequenced and summed:
1/4 second:
1 second:
5 seconds:
? seconds: - 0 to 1 second, chosen randomly
In the case of the timer, the sum specifies the amount of time to start the timer with.
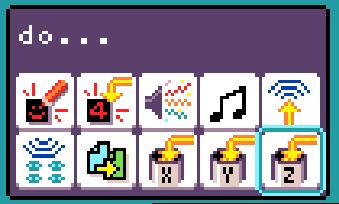
DO section
The right-hand side of a rule, the Do section, starts with a command tile from the following list:
-
show imageshows an animation sequence on the LED screen. 
show numbershows a numeric value between 0 and 99-
sound emojiplays a sequence of emojis 
play notesplays a sequence of notes (from the C major scale)
radio sendsends a given number over the radio
radio set grouptakes a number and ensures that radio messages from a different group number are ignored (the default radio group is 1, which means all micro:bits see all messages)
switch pagetransfers execution control to a given page
set variableputs a number into a variable (X,Y,Z); defaults to 0 if no value specified; also and
and 
A command can be followed by various parameter tiles, depending on the type of command. As with events, every command has a default parameter, for the case where no parameter tile is given:
-
screenshows ahappy faceby default -
sound emojiplays
giggleby default -
radio sendsends the number1by default -
switch pageswitches to page1by default 
get variablegets the number from a variable (X,Y,Z); defaults to0if variable wasn’t previously set. Also and
and 
Asset editors
Two editors are provided to allow the creation of 5x5 LED images and simple melodies.
LED image editor
THe LED image editor lets you select which LEDs are on/off for a frame of an animation. You can continue to add LED images in a sequence (the editor will make a copy of the last image):
Melody editor
The melody editor lets you compose a four note sequence, where each note can be C,D,E,F, or G:
Constructing numbers
For commands that expect a numeric value (![]()
radio send, ![]()
set variable), a variety of tiles are available
- the constant values
 1, 2, 3, 4 and 5 dots
 - the values of variables
X,Y, andZ - the value of the radio receive event
 , only available if WHEN section has radio receive event
 - the value of the temperature sensor
 , always available
 - a
 random number generator yields a random integer between
 1and5(inclusive) by default

repeat (loops)
A ![]()
repeat tile
can be added to certain commands to repeat the entire DO section. The value tiles
after repeat determine the number of iterations. If no value is given, it repeats forever.

- when press micro:bit logo, do show image happy animation and repeat
 3 times.
Jacdac
MicroCode will detect connected Jacdac modules and automatically display programming tiles for them. Tiles are available for all modules in Kittenbot Jacdac Kit A, as as well as the Forward Education Climate Kit. Many of the modules in Kittenbot Jacdac Kit B also are supported.
Robot
MicroCode can be used to control a micro:bit robot (read more). Make sure to start your program by setting the same radio group as the robot.

DO section
The ![]()
robot starts the robot motor commands. Any of those can be sequenced in the same rule.

forward, instructs the robot to move forward.
fast forward, instructs the robot to move forward at maximum speed
reverse, instructs the robot to move backward
turn left, instructs the robot to turn left
spin left, instructs the robot to spin left
turn right, instructs the robot to turn right.
spin right, instructs the robot to spin right
stop, instructs the robot to stop
The robot had LEDs that can be controlled as well.

LED red, turns LED to red
LED green, turns LED to green
LED blue, turns LED to blue
LED OFF, turns LEDs OFF
Some robot have an optional robotic arm.

arm open, opens the arm
arm close, closes the arm

The robot will automatically slow down when it detects a line; unless you are running it in fast forward. This greatly stabilizes line following algorithms.
WHEN section
The robot distance sensor is exposed as a wall tile; and the line sensor as a line tile.

wall detected, triggers when an obstacle is detected; (levels 1 - 5, where 1 means obstacle close, 5 means far away in multiple of 5cm)
Line detection is typically done with two infrared sensors under the robot.

line change detected
There are 3 cases when a line is detected:
 both,
both, left,
left, right.
There are 3 possible state when the line detector is not detected:
 no line detected coming from a left line,
 no line detected coming from a right line,
 no line detected
coming from both lines,
no line detected
coming from both lines,